How to Make Ultra-High-Quality GIFs
Have you ever seen a GIF so crisp that you thought to yourself, “Why aren’t they all like that?”

Recently, I had that experience while making my Figma Tutorial. Specifically, while I was researching other tutorials on Figma’s website, I stumbled across this GIF:
The size. The quality. And that length. “Well,” I thought to myself, “GIFs are a famously inefficient file format. This GIF must be at least 10 MB.”
You should have seen my face when I right-clicked the properties of this bad boy.
198 KB.
ON A 1286 x 1166 GIF.
“How is this possible?” I wondered.
What followed was over a week of rabidly testing various free and even paid methods (all free trials, don’t worry). I started with the free GIF makers: Giphy, ezgif, Xconvert, Adobe’s online tools, Canva, and many more. When none of those panned out, I got a free trial of Photoshop and tried to make one there. “Surely a paid option will bring the highest quality,” I thought. After locking up my computer two or three times only to receive a GIF with barely higher quality than the free websites, I gave up on that as well. Even googling reddit threads on the art of GIF-making couldn’t save me. For days, I was truly lost.
There was one option, however, that had sporadically popped up in my research, yet I dreaded the jungle of information I would have to wander through. I eventually discovered a program called FFmpeg was reportedly used as a backend for many of the free GIF websites I was using. Initially, I avoided it, thinking surely one of the free GIF makers could utilize FFmpeg in a user-friendly manner while still outputting high-quality GIFs. But after many days of frustration testing these other options, I realized I would have to figure it out myself if I wanted the desired results.
And then I finally got them.

Here’s a GIF I made that’s 2304 x 1296, 15 FPS, and only 1.68 MB. Double the resolution of the original GIF, triple the frames, and 50% more length.
There are likely more ways to optimize the process I pieced together, but I wanted to put this guide out there as a starting place for people like me who had no idea how to even make a GIF without a third party website.
Get your video
This guide assumes two things:
- You’re trying to make the GIF on Windows.
- You have a premade clip that you want to turn into a GIF.
If you don’t already have an MP4 or other video file, you can record your own screen with tools like OBS, Xbox Game Bar, NVIDIA Shadowplay, or a plethora of other programs you can find online. You can also just download a clip or reaction from a video, or even manually make frames if you have your own art or animation that you want to make into a GIF.
If you want to follow along from Mac or Linux, GIMP and FFmpeg are accessible on both operating systems, so you can follow along with the non-Windows steps without much hassle.
Once you have a high-quality video clip that you want to GIF, you’ll be ready to start.
Download FFmpeg
- Visit the download page for FFmpeg.
- Under “Get packages & executable files,” hover over Windows.
- Select “Windows builds from gyan.dev.”
- Under “latest git master branch build,” download “ffmpeg-git-full.7z.”

Install FFmpeg
First, we’ll need to install FFmpeg and put it in a place that will be easy to access.
- Extract the file you downloaded into this folder using 7Zip. You can do this by right clicking on the downloaded file, hovering over 7Zip, and clicking “Extract Files…” to select a folder to extract to or “Extract Here.”
- Rename the new folder to “ffmpeg.”
- Move the folder to a place easily accessible from the command line for you. For most people, that will be your base C drive.

Setup Windows PATH
Next, we’ll need to configure PATH in Windows. If you’re unfamiliar with PATH, setting it up for FFmpeg will allow Windows to locate its executable when you type in the terminal, which will make running the program much easier.
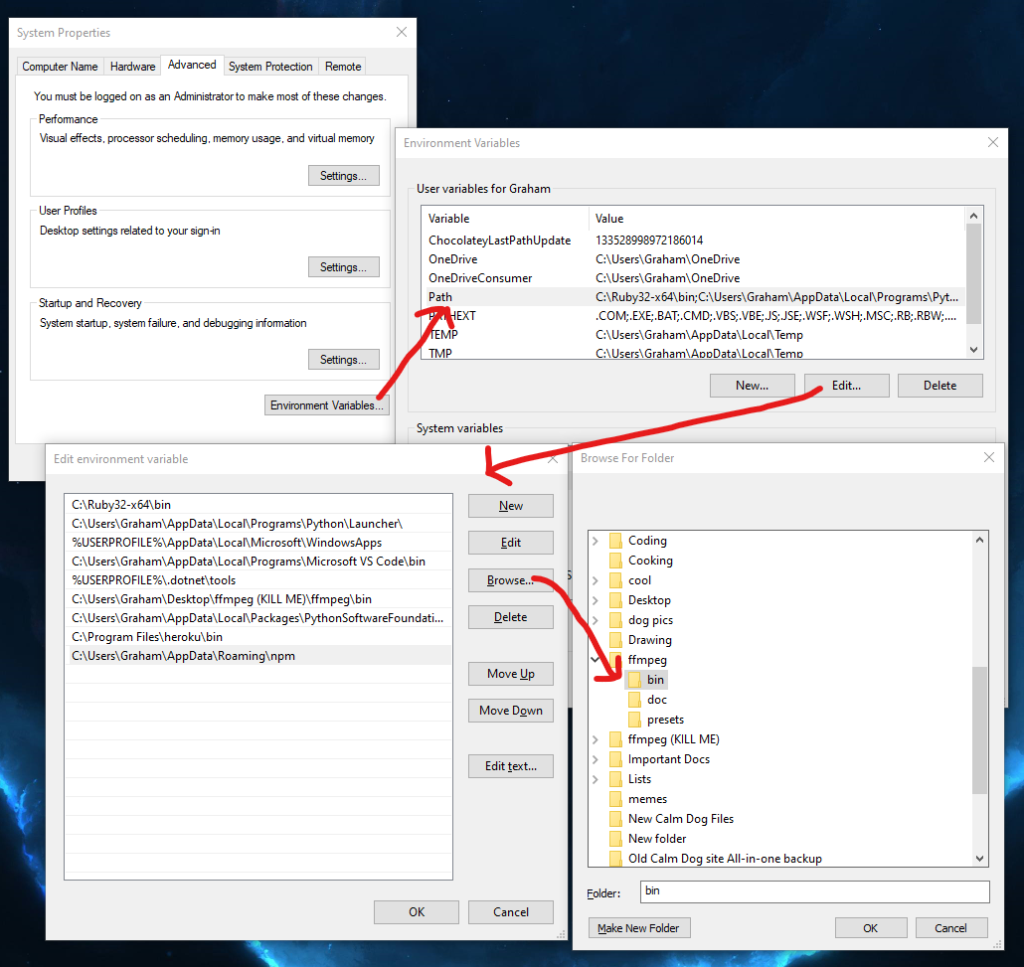
- Type “system variables” into your search bar and click the “Edit the system environment variables” option.
- It should bring you to the Advanced tab in a window called “System Properties.” In the Advanced tab, click the button “Environment Variables” near the bottom.
- Under “User Variables for (Your system name),” click on the variable “Path” in the box, and then “Edit…”
- Choose “Browse…” from the side menu and navigate to the folder you unzipped FFmpeg in to.
- Select the “bin” folder, then press OK at the bottom.
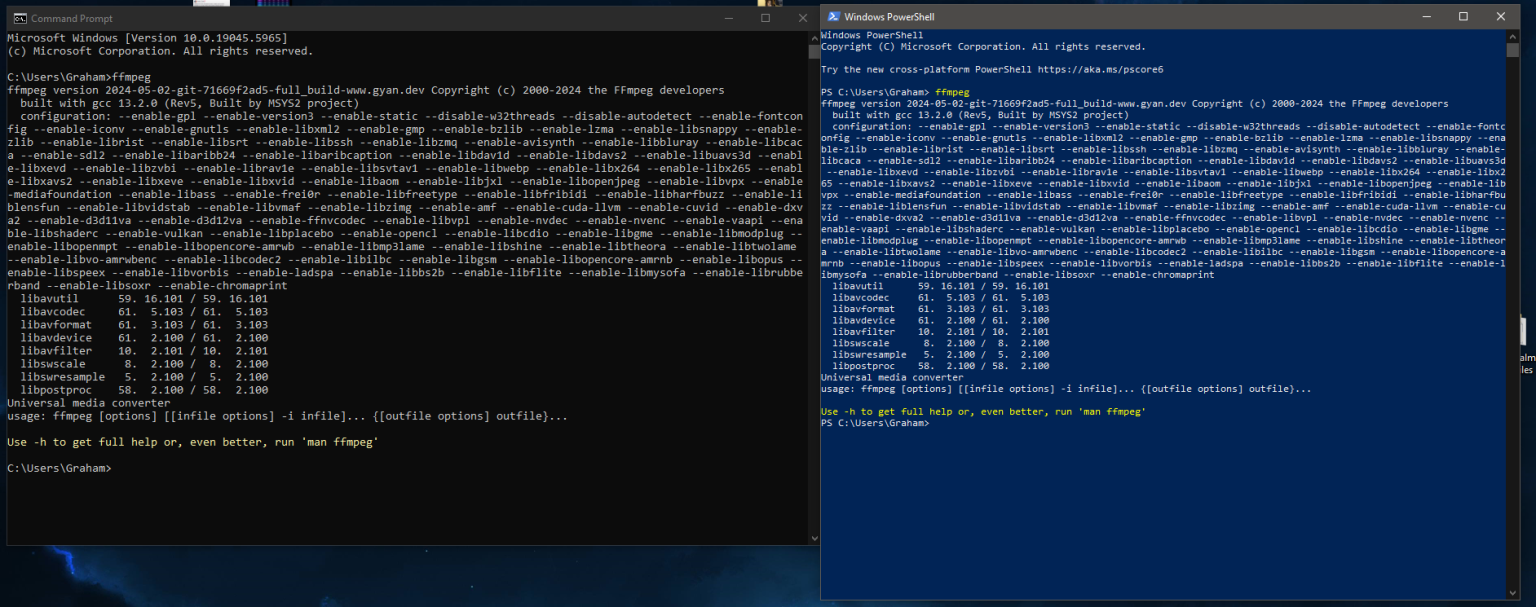
We can now use FFmpeg from the terminal. If you’ve done this correctly, you should be able to type “ffmpeg” into your terminal or PowerShell and see an output from the program like below.
Separate the frames
We’re now ready to separate the frames of the video. The way FFmpeg works is it takes the video you give it, then separates certain frames of the video into individual images which will make up our GIF later. Let’s set this all up now.
- Make another folder inside ffmpeg to save the files to. Make it one word, as that will make it easier to type into the terminal.
- Move the video you want to make a GIF of into the ffmpeg folder.
- With cmd or PowerShell, navigate to the folder which you made in step 1 (“dir” shows folders in your current directory, “cd” and then the file name will move you into that directory, and “cd ..” takes you back) .
- Type the following command into the terminal : ffmpeg -i yourclipname.mp4 -r 20 foldernameinstep1/image-%3d.png
(change “yourclipname” and “foldernameinstep1”; everything else remains the same unless you want to change something from below like FPS)

-i denotes your input file and -r denotes how many frames you want it to be, the rest is what your images will be and where they will go. This command will break your video into frames that will eventually make a GIF that is 20 FPS. FPS will drastically affect file size and smoothness inversely.
IMPORTANT: When choosing FPS, make sure 100 divided by that number is a whole number (or very close to it). Any of these FPS numbers should be fine: 5, 10, 11, 12.5, 14, 16.5, 20, 25, 33, or 50. If you don’t pick one of these numbers, your GIF may appear sped up or slowed down later.
If you want more buttery smoothness to your GIF, the maximum I would recommend is 50 FPS, although 33 is usually enough to achieve GIF smoothness. Technically, you can go up to 100, but most browsers will only support up to 50 FPS. If you’re making it for yourself and you have something that can play 100, go for it.
You can read more about GIF FPS here.
Open GIMP
Depending on the size of the file you’re dealing with, it may take a second. In the meantime, install and open GIMP.
- Visit this page.
- Click Download GIMP (Version Number) directly.
- Follow the steps of the install until the program is open.

Make the GIF
Now we can actually make the GIF.
(Note: Steps 4 and 5 will impact the quality of your GIF. You can skip these steps and still be fine, but if you’re more concerned about file size than quality, I would highly recommend these steps.)
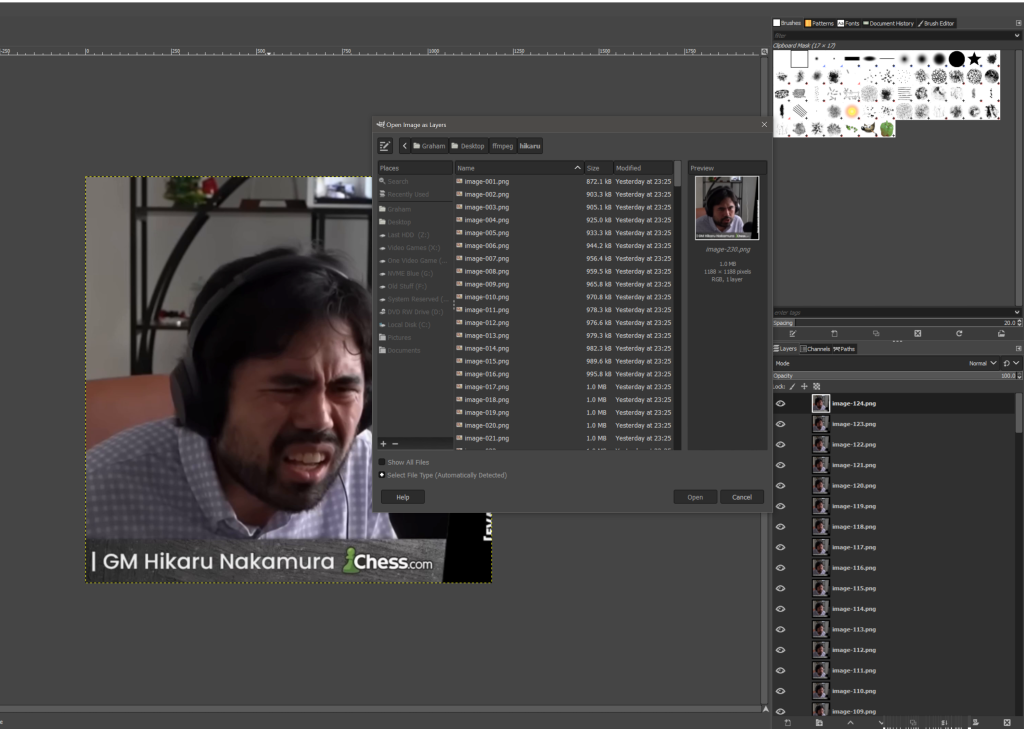
- Click on File in the top left, then click “Open as Layers.”
- Select all photos in the folder you created (You can do this by left-clicking on the top or bottom image in the folder, then shift-clicking on the opposite of the first one you clicked. So if you click on the first image in the list, shift-click on the last one in the folder).
- (Optional) After GIMP has imported each image, you can preview your GIF by going to Filters, then Animation, then Playback. Press play to see your GIF. (Be aware your GIF will change SIGNIFICANTLY from what you see here based on steps 4/5 and the settings you choose while exporting).
- (Optional: This w/ step 5 will reduce final size of GIF, but reduce quality) Go to Filters -> Animation -> Optimize your GIF.
- (Optional) Go to Image -> Mode and swap RGB to Indexed. Set a maximum color palette to 127, then press okay.
We’re now ready to export. This may take some tweaking depending on what frame rate you chose to export your video at.
- Select File -> Export As
- Navigate to somewhere that you can access your GIF easily.
- Name your GIF anything and put .gif at the end (so something like: anything.gif).
- Select “As Animation”
- Under delay between frames, make the delay 1000 divided by the frame rate selected in the command prompt. For our GIF, since we made it 20 FPS when dividing up the frames, we’re going to select 50ms. If you selected something like 15, you may want to export two different GIFs at 70 ms and 60 ms to see which moves closer to what you want.
- Check “Use delay entered for all frames.”
- Export that baddie.

Depending on the size of your GIF, this final step may take the most time out of all the others.
Compression
Once your GIF has exported, we’re going to compress it. If you don’t need it to be a smaller size, you can skip this section.
- Open any free GIF compressor (I’ll explain some ways to tweak the size after for Ezgif, but there are also others like FreeConvert and XConvert).
- Upload your GIF.
- Select Optimize, then press Optimize GIF.
- Download your optimized GIF.
Congrats! You should now have a high-quality, low-size GIF.

Sources
If you want to see where I compiled most of this information, check out these links:
https://ffmpeg.org/ffmpeg.html
https://phoenixnap.com/kb/ffmpeg-windows
https://wunkolo.github.io/post/2020/02/buttery-smooth-10fps/
https://help.figma.com/hc/en-us/articles/14078912322199-Design-your-first-button
https://www.maketecheasier.com/create-gif-from-video-gim